Today I am especially happy. I think it was to start the week with chocolate. That always works! I had weeks planning to make this recipe that they call in many ways: quesillo cake, impossible cake, impossible cake, chocoflan and the truth is that I fell in love with the result; I had already made quesillo, and also the moist chocolate cake that is delicious, but never the two together and it seemed like a fun way to eat these two sweeties at the same time so I got down to chocolate without thinking much and started. Easier than you think, delicious and very beautiful to look at, here I leave you all the detail as always in photos and video so that you can enjoy it with family or friends. I hope you love it like me!
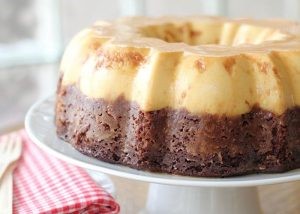 Photo thanks to https://placeralplato.com/postres/chocoflan-o-tarta-imposible
Link original photo Here
Ingredients for the chocoflan or impossible cake
There are three steps that we will do in parts, first the caramel that goes in the bottom that when turning will be the top of the cake, then the quesillo or flan in the middle and finally the chocolate cake.
For the caramel we will need:
• 1/4 cup of water
Ingredients for the quesillo or flan
• 5 eggs
• 1 can of condensed milk of 395 gr
• 395 gr of milk (we will use the measure of the condensed milk can)
• 1 spoon of vanilla
Ingredients for the moist chocolate cake
• 4 eggs
• 1 and 1/2 cups of wheat flour
• 1 cup of cocoa or chocolate powder (not instant)
• 1 and 1/2 cups of sugar
• 1/2 cup of milk
• 1/2 cup oil
• 1 tablespoon of baking powder (10 gr)
• Crown mold 24 cm in diameter or a round 20 cm
Preparation of Chocoflan or impossible cake in video
‘゚ ・ ✿ .。.: * *.:。 ✿ * ゚’ ゚ ・ ✿ .。.: * *.:。 ✿ * ゚ ¨ ゚ ✎ WATCH VIDEO ✎ ・: 。✿ * ゚ ‘゚ ・ ✿ .。 .: * *.:。 ✿ * ゚ ‘゚ ・ ✿ .。.: *
Step 1 – The Candy
The first thing to do first of all is to have the mold buttered to have it ready for when the caramel is ready. We will start with the caramel and put a small pot over medium heat, we will add half a cup of sugar and a 1/4 cup of water. We will let it caramelize by itself, for this we should not stir it or touch it because doing so will crystallize the sugar, there will be lumps, it is not what we want. The heat will do its job by itself.
We have to be very vigilant, since when it begins to take color we must lower the flame and move the pot with circular movements so that it caramelizes evenly and when the color is light caramel we must immediately empty it into the mold that we have previously buttered. And I say fast because even if we turn off the fire, it burns the same way it turned black in 2 seconds and I had to do it again: / It looks more beautiful if we make it in those molds that have a hole in the middle or crown molds in English it is called bundt bread.
Step 2 – Preparation of the Quesillo or flan
We will beat by hand in a large bowl or in the blender as you prefer the 5 eggs, the condensed milk, the same measure of the can of the condensed in whole milk and the tablespoon of vanilla. We will add this mixture to the mold where we have emptied the caramel, which by now is cold and hard.
We will bake this cheese in a Bain-Marie at 220ºC for 20 minutes, this is important so that it does not burn on the bottom or on the sides and it looks very nice, while it is baking we are going to prepare the chocolate cake mixture.
Step 3 – Preparing the wet chocolate cake
It couldn’t be easier, all we have to do is mix all the ingredients by hand in a bowl and that’s it. Isn’t it wonderful? It seems incredible that the simplest is the richest. Well, this is the case with this cake … that when I make it alone I cover it with nutella and I give myself life!
After 20 minutes of the quesillo (flan) in the oven, we take it out and add the mixture of the chocolate cake carefully that it does not fall too abruptly and with a spatula we will spread it well throughout the mold so that it is uniform.
We return to the oven equal to 220ºC in a bain-marie. If the water is consumed, heat a little more and add it. We will bake between 40 and 45 minutes maybe a little more or a little less depending on your oven, I always repeat, not all are the same. It will be ready when you insert a toothpick and it comes out dry.
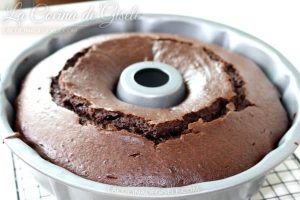
We remove the cake from the oven and let it cool for an hour on a rack. Then with a knife we very carefully introduce it through the sides of the mold to detach it a little if necessary. We now place a large plate on it and we will turn quickly. We arrange it a little so that it is in the center of the plate and we will tap the mold just in case so that it comes loose, we remove the mold and voilà! We already have this beauty that will leave everyone delighted.
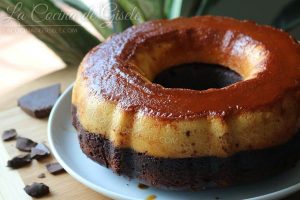
We will let it cool well before serving. And well, here we have two recipes in one 🙂
Don’t forget to share it! Above are all the networks 🙂 You can not stop seeing the Christmas Trunk that is delicious, special for Christmas dinner click here to see it or to the photo for the recipe.
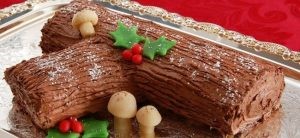
https://www.guiainfantil.com/navidad/recetas/tronco-de-navidad-o-navideno-el-origen-de-este- traditional-christmas-dessert / [/ caption]
I hope you liked it! When you prepare it, leave me your comments, I love reading them and answering them the same if you have any questions or want a recipe, do not hesitate to write to me.